Features:
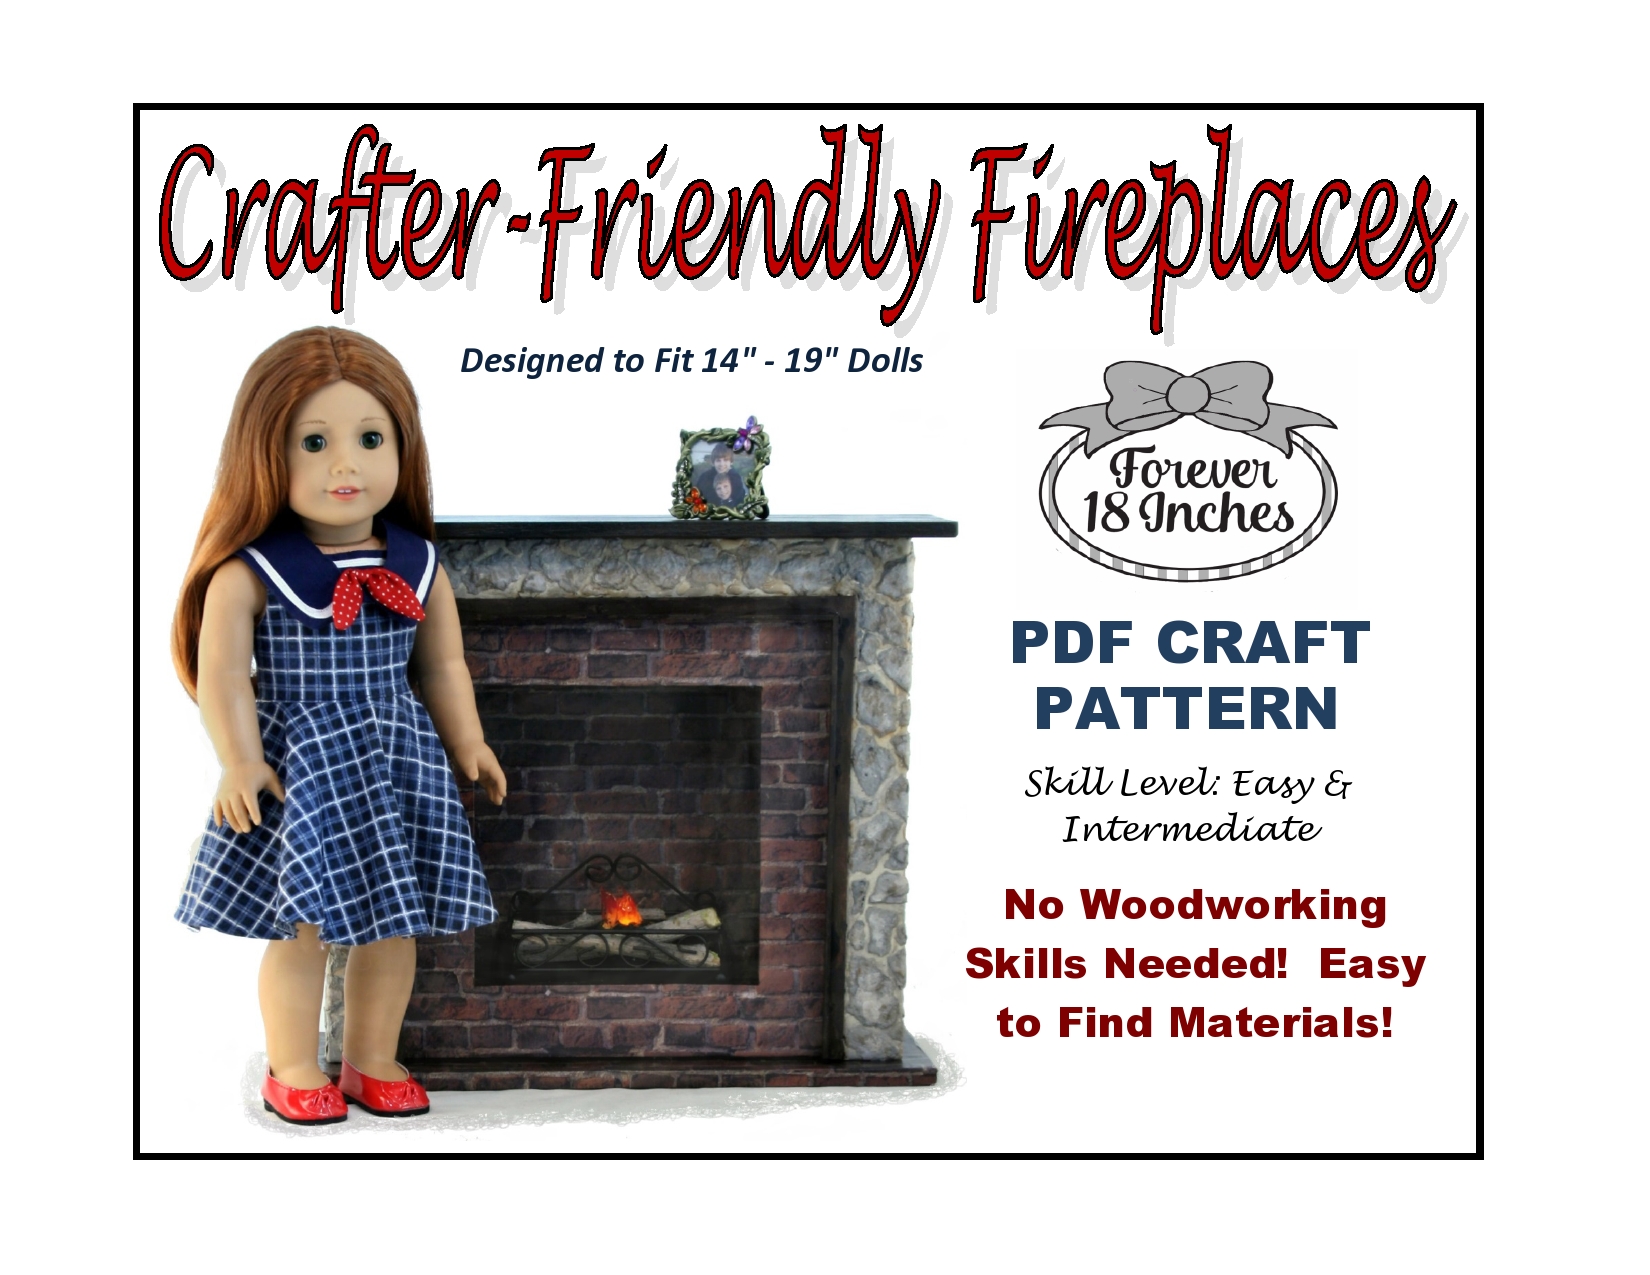
There’s nothing like a fireplace to evoke feelings of cozy warmth and comfort. Humans have been drawn to their hearths and flames for hundreds of years, and now it’s time for dolls to have their own version, too!
The Crafter-Friendly Fireplaces pattern has been designed for people who love crafts but lack wood-working skills or tools. Three versions ranging from Easy to Intermediate are included: A Classic Fireplace with painted balsa wood sheathing, a Rustic Fireplace with a faux rock covering, and a Simple Fireplace that can be created entirely from glue, Foam Core, and paper. The Fireplace fits a range of popular dolls measuring 14″ – 19″. All of the pieces for the fireplaces can be cut with a sharp-bladed utility knife and are fitted together with hot glue, packaging tape, and glue sticks. Materials used for construction are common items easily found in craft and hobby stores, home building supply stores, dollar stores, and stationery supply vendors. A list of alternate materials that can be substituted for key items on each supply list is also included. Read through the instructions and alternative supply list before purchasing materials and beginning your project. You may save some money and travel time!
Finally, a bonus tutorial to create authentic-looking logs and flames that really flicker is included with the fireplace instructions. Dolls like to warm their hands near a fire, too!
Some Notes on Scale:
Although the scale for the fireplace and accessories is approximately 1:3 there’s quite a bit of visual leeway. When I experimented I found that most 14″ dolls up to 19″ dolls eased comfortably into a portrait that included the fireplace as a backdrop. Brands that fit naturally into the scale include 16″ A Girl for All Time®, 18″ American Girl®, 14.5″ WellieWishers™, 19″ Gotz® dolls, Sylvia Natterer’s 19″ Finouche and 17″ Starlette , and 19″ Zwergnase Jr.® dolls.
Supplies:
Part I Supply List *: Classic Fireplace
To Construct the Fireplace Frame:
- Three sheets of approximately 21″ wide x 30″ long x 3/16″deep Foam Core board. (OR: cardboard from similarly-sized large boxes–just be prepared to adjust cutting measurements for certain pieces of the fireplace. No measurements for cardboard are given because of the variation in cardboard thicknesses.) (Note: if you substitute cut Foam Core for the brick paver, you’ll need FOUR sheets of Foam Core board instead of three sheets.)
- A utility knife
- A long ruler for guiding cutting (I recommend a 24″ metal ruler backed with cork to help prevent slipping)
- A large surface on which to cut Foam Core, paper, and balsa wood (I recommend a self-healing cutting mat used for fabrics that includes 45 degree cutting guidelines)
- A hot glue gun (the type used for crafting)
- A bag of hot glue gun sticks (you’ll be using A LOT of glue)
- Two giant-sized school glue sticks in a tube (I used Elmer’s Washable Purple School Glue Sticks®)
8 A brick PAVER (not a full brick) measuring approximately 1-5/16″ deep x 3-3/4″ wide x 8″ long to help weight and ground the fireplace
- Scissors for cutting paper
- Optional: A T-square to help make accurate 90 degree cuts
- Clear packaging tape used for shipping boxes
*A list of alternate supplies for several items is listed on pages 33-34. All supplies listed were easy to find in my urban area, but crafters who live in more rural settings might be challenged. Also, check the list before purchasing supplies for cost-saving ideas. For instance, sturdy cardboard from a shipping box can be substituted for Foam Core board. I didn’t use it in the demonstration photos because it isn’t standardized, but it’s certainly the least expensive choice.
Part II Supply List : Classic Fireplace (Continued)
- One large flat-bristled brush with soft hairs and a good spring (bristle area approximately 1-1/2″ long by 7/8″ wide).
- Four pieces of 12″ x 12″ scrapbooking paper for the firebox and front facing (I used a brick-printed paper) OR one roll of similar adhesive-backed shelving paper, OR even gift-wrapping paper. Note: Plain black or dark gray paper may be substituted for the brick-printed paper.
- Optional: two pieces of 12″ x 12″ scrapbooking paper (OR adhesive-backed shelf paper OR gift-wrapping paper) to cover an optional Foam Core hearth (I used brick-printed paper to match the firebox.) One large roll or two small rolls of shelving paper should be enough for the inside of the firebox, the outside firebox facing, and hearth).
- One piece of 3/8″ deep x 6″ wide x 36″ long balsa wood (for the mantle), OR two pieces of 12″ x 12″ scrapbooking paper (OR adhesive-backed shelf paper OR gift-wrapping paper) to cover a foam core mantle.
- Two pieces of 1/8″deep x 6″ wide x 36″ long balsa wood (for the fireplace sides & front sheathing)
- One piece of 1/8″ deep x ½” wide x 36″ long balsa wood (for the firebox trim)
- Optional: Two pieces of 1/8″ deep x 1/8″ wide x 36″ long balsa wood (for the firebox trim)
- Optional: Omit Item Nos. 6 & 7 balsa wood trim and substitute one piece of purchased cove molding measuring approximately 11/16″ wide that’s at least 36″ long.
- Optional: a coping saw if you choose to use cove molding
- Optional: a miter box if you choose to use cove molding
- Spackle to fill in wood joints
- Extra fine-grit finishing sand paper to shape and smooth the balsa wood or cove molding
- Acrylic paint for the wooden sheathing, mantle, and trim (I used a large tube of white fine art paint with excellent coverage)
- A very small amount of black acrylic paint to simulate smoke patterns in the firebox
- Optional: a couple of small cosmetic sponges to rub out bubbles in the scrapbooking paper and to apply smoke patterns
Part I Supply List *: Rustic Fireplace
To Construct the Fireplace Frame:
- Three sheets of approximately 21″ wide x 30″ long x 3/16″deep Foam Core board. (OR: cardboard from similarly-sized large boxes–just be prepared to adjust cutting measurements for certain pieces of the fireplace. No measurements for cardboard are given because of the variation in cardboard thicknesses.) (Note: if you substitute cut Foam Core for the brick paver, you’ll need FOUR sheets of Foam Core board instead of three sheets.)
- A utility knife
- A long ruler for guiding cutting (I recommend a 24″ metal ruler backed with cork to help prevent slipping)
- A large surface on which to cut Foam Core, paper, and balsa wood (I recommend a self-healing cutting mat used for fabrics that includes 45 degree cutting guidelines)
- A hot glue gun (the type used for crafting)
- A bag of hot glue gun sticks (you’ll be using A LOT of glue)
- Two giant-sized school glue sticks in a tube (I used Elmer’s Washable Purple School Glue Sticks®)
8 A brick PAVER (not a full brick) measuring approximately 1-5/16″ deep x 3-3/4″ wide x 8″ long to help weight and ground the fireplace
- Scissors for cutting paper
- Optional: A T-square to help make accurate 90 degree cuts
- Clear packaging tape used for shipping boxes
*A list of alternate supplies for key items is listed on pages 35-36. All supplies listed were easy to find in my urban area, but crafters who live in more rural settings might be challenged. Also, check the list before purchasing supplies for cost-saving ideas. For instance, sturdy cardboard from a shipping box can be substituted for Foam Core board. I didn’t use it in the demonstration photos because it isn’t standardized, but it’s certainly the least expensive choice.
Part II Supply List: Rustic Fireplace (Continued)
- One large flat-bristled brush with soft hairs and a good spring (bristle area approximately 1-1/2″ long by 7/8″ wide).
- Four pieces of 12″ x 12″ scrapbooking paper for the firebox and front facing (I used a brick-printed paper) OR one roll of similar adhesive-backed shelving paper, OR even gift-wrapping paper. Note: brick-printed paper can be substituted with plain black or dark gray paper for the interior of the firebox.
- Optional: two pieces of 12″ x 12″ scrapbooking paper (OR adhesive-backed shelf paper OR gift-wrapping paper) to cover an optional Foam Core hearth (I used brick-printed paper to match the firebox.) One large roll or two small rolls of shelving paper should be enough for the inside of the firebox, the outside firebox facing, and hearth).
- One piece of 3/8″ deep x 6″ wide x 36″ long balsa wood (for the mantle), OR two pieces of 12″ x 12″ scrapbooking paper (OR adhesive-backed shelf paper OR gift-wrapping paper) to cover a foam core mantle.
- Two paper egg cartons for the fireplace sides and partial front facing.
- Two pieces of 1/8″ deep x ½” wide x 36″ long balsa wood for the firebox trim
- Optional: Two pieces of 1/8″ deep x 1/8″ wide x 36″ long balsa wood for the firebox trim
- Optional: Omit Item Nos. 6 & 7 balsa wood trim and substitute one piece of purchased cove molding measuring approximately 11/16″ wide that’s at least 36″ long.
- Optional: a coping saw if you choose to use cove molding
- Optional: a miter box if you choose to use cove molding
- Spackle to fill in wood joints
- Extra fine-grit finishing sand paper to shape and smooth the balsa wood or cove molding
- Acrylic paint for the mantle, trim, smoke pattern in the firebox, and simulated rock facing (I used a large tube of Titanium White, and smaller tubes of Ivory Black, Raw Sienna, and very small amounts of Cobalt Blue and Red Oxide Liquitex fine art paint.)
- A quick-setting craft glue to apply the torn pieces of the egg carton to the fireplace.
- Optional: a couple of small cosmetic sponges to rub out bubbles in the scrapbooking paper, apply smoke patterns, and dab paint onto faux “rocks.”
- Mod Podge® in a matt finish to seal the faux egg carton “rocks” and Mantle
- A light neutral-toned spray paint
Part I Supply List*: Simple Fireplace
To Construct the Fireplace Frame:
- Three sheets of approximately 21″ wide x 30″ long x 3/16″deep Foam Core board. (OR: cardboard from similarly-sized large boxes–just be prepared to adjust cutting measurements for certain pieces of the fireplace. No measurements for cardboard are given because of the variation in cardboard thicknesses.) (Note: if you substitute cut Foam Core for the brick paver, you’ll need FOUR sheets of Foam Core board instead of three sheets.) See the Alternate Supply list on pages 29-30 for more information.)
- A utility knife
- A long ruler for guiding cutting (I recommend a 24″ metal ruler backed with cork to help prevent slipping)
- A large surface on which to cut Foam Core, paper, and balsa wood (I recommend a self-healing cutting mat used for fabrics that includes 45 degree cutting guidelines)
- A hot glue gun (the type used for crafting)
- A bag of hot glue gun sticks (you’ll be using A LOT of glue)
- Two giant-sized school glue sticks in a tube (I used Elmer’s Washable Purple School Glue Sticks®)
8 A brick PAVER (not a full brick) measuring approximately 1-5/16″ deep x 3-3/4″ wide x 8″ long to help weight and ground the fireplace
- Scissors for cutting paper
- Optional: A T-square to help make accurate 90 degree cuts
- Clear packaging tape used for shipping boxes
*A list of alternate supplies for key items is listed on pages 29-30. All supplies listed were easy to find in my urban area, but crafters who live in more rural settings might be challenged. Also, check the list before purchasing supplies for cost-saving ideas. For instance, sturdy cardboard from a shipping box can be substituted for Foam Core board. I didn’t use it in the demonstration photos because it isn’t standardized, but it’s certainly the least expensive choice.
Part II Supply List : Simple Fireplace (Continued)
- One large flat-bristled brush with soft hairs and a good spring (bristle area approximately 1-1/2″ long by 7/8″ wide).
- Four pieces of 12″ x 12″ scrapbooking paper for the firebox and front facing (I used a brick-printed paper) (OR one roll of similar contact paper) Note: If you can’t find brick-printed paper you can substitute plain black or dark gray paper for the interior fire box/facing.
- Optional: two pieces of 12″ x 12″ scrapbooking paper to cover an optional Foam Core hearth (I used brick-printed paper to match the firebox; similar adhesive-backed shelf paper can also be used. One large roll or two small rolls should be enough for the inside of the firebox, the outside firebox facing, and hearth). Note: If you can’t find brick-printed paper you can substitute plain dark gray paper for the interior fire box/facing.
- One piece of 3/8″ deep x 6″ wide x 36″ long balsa wood (for the mantle), OR two pieces of Foam Core board cut with the same dimensions and glued together. (If you use Foam Core board you will also need two pieces of 12″ x 12″ scrapbooking paper OR adhesive-backed shelf paper OR gift-wrapping paper to cover the foam core mantle.)
- Optional: a couple of small cosmetic sponges to rub out bubbles in the scrapbooking paper & apply smoke patterns.
Part III Supply List (All Versions): Faux Flames & Logs
- A flameless tea light
- Hot glue gun/glue sticks (already mentioned in the Part I Supply List)
- A small square of aluminum foil
- A red permanent marker with a chisel or medium-sized rounded tip
- A yellow permanent marker with a chisel or medium-sized rounded tip
- A small branch cut into doll-sized pieces for logs
- A small amount of black acrylic paint and a brush to add a charred effect to the logs (paint and brush already listed in Part II Supply List)